Showing posts with label modelling. Show all posts

Thursday, March 8, 2018

Step-by-step - Rogue Trader habitat


I’ve designated 2018 as my Year of Rogue TraderTM. I’ve accumulated a modest pile of RT miniatures over the last couple of years and have painted precisely one of them. So this year I’m going to make a dent in the pile.

My aim is to paint enough minis for a small skirmish game – say a dozen a side – covering two or three different forces, plus scatter terrain and a 4’x4’ board. I reckon that’s achievable even if I get distracted by some side projects along the way!

Progress is going well. My Mentor Legion squad was finished yesterday, and I’m pretty pleased with how they turned out. The freehand insignias weren’t as tricky as I thought they would be! I entered the dreadnought in the Eavier Metal 20 Year painting competition with no expectation of winning but just for the heck of it. I spent a bit more time on it than I might have otherwise, but I just don’t think I have the patience to produce really quality work. I’d rather have lots of OK painted minis than a few good ones!

Mentor Legion ready to rumble
 I’ve also been working on the terrain. So far I’ve completed some plants (and have a few more on the way), and some floating gas spore greebies. I’ve also finished three habitats for my campaign world of Zenithal Prime (see what I did there?), and I thought people might be interested in a step-by-step.
Death world flora at its finest

Giant purple gas spores - but of course
 The main part of the structure is a plastic thing I picked up (along with most of the rest of the bits I’ve used) from Reverse Garbage. If you live in Brisbane, go and check it out. They take office and commercial waste that would otherwise go to landfill and re-sell it. It’s a great source of odds and ends for terrain building. I’ve no idea what these things were originally used for, but they’re the perfect size and shape for a habitat on a harsh frontier world.

Odd plastic thing
Bits and pieces were stuck on with PVA to give the models a bit of interest – old computer bits, bency straws and the things that cover plugs on electical appliances. The door way was cut out, a piece of cereal packet card glues over the inside of the hole and thicker card cut to form a door and stuck to it. The buildings are based on old CDs.

Now with extra bits
I was almost going to leave them untextured, as the plastic thing had a bit of roughness to it, but changed my mind and was glad I did. I mixed polyfilla with water and sand from the kids’ sandpit to make a gritty paste and slathered it on. Once it was dry, I spray primed it grey and painted it with emulsion that I had tinted P3 Rucksack Tan for my wizard’s tower. I drybrushed it with 2:1 white:Rucksack Tan and voila!

Texture added
The bits were painted P3 Sulfuric Yellow, washed with Agrax Earthshade and then weathered by sponging on P3 Bloodstone and P3 Greatcoat Grey, followed by more Earthshade. I’m really happy with how those bits turned out – just the look I was going for!The doors were GW Ironbreaker washed with Earthshade and splotched with Bloodstone.

Ready for the settlers to move in
Next up terrain-wise is a larger habitat followed (probably) by the power generator for the growing settlement. Thanks for stopping by!

Sunday, August 27, 2017

Warpfire thrower template

One of my favourite parts of Oldhammering is scratch building, and making little odds and ends. I've also decided to paint a 1,500 point skaven army (more about that in a later post). So that gave me a perfect excuse for making a template for my warpfire throwers!

I'm not too keen on the flimsy paper template in the back of the 3rd ed rulebook. Even stuck on some card, it doesn't look that great. So, how to make a 1 inch radius template that looks something like a mass of burning warpfire?

Starting point was some plastic card I picked up from one of my favourite shops, Reverse Garbage. I cut out a circle of the right size and used a protractor to mark 30 degree angles. I then cut out notches to give me the 'clock face' for working out deviation.

For the 'fire' I decided to see what would happen if I mixed polyfilla with pva glue and a bit of water. What happens is as soon as you mix the glue in it seizes up into quite a solid mass. I then used a toothpick and a silicone modelling tool to shape it. This is a test piece.


I found that as it dried the detail smoothed out, so I just went back and redetailed it before it completely dried and that seemed to work.

Here's the finished product.

Bless you


I painted it with a mix of white and VGC Escorpena Green, then a heavy drybrush with straight green and a lighter drybrush on the high bits and at the edges with - I think - VGC Dark Green. Some green ink was splotched on, followed by yellow ink which I think has worked quite well to give it a warpstone-like tinge.

Burn, baby, burn


At some point I'll do something similar for a poisoned wind globe. Thanks for stopping by!

Sunday, January 3, 2016

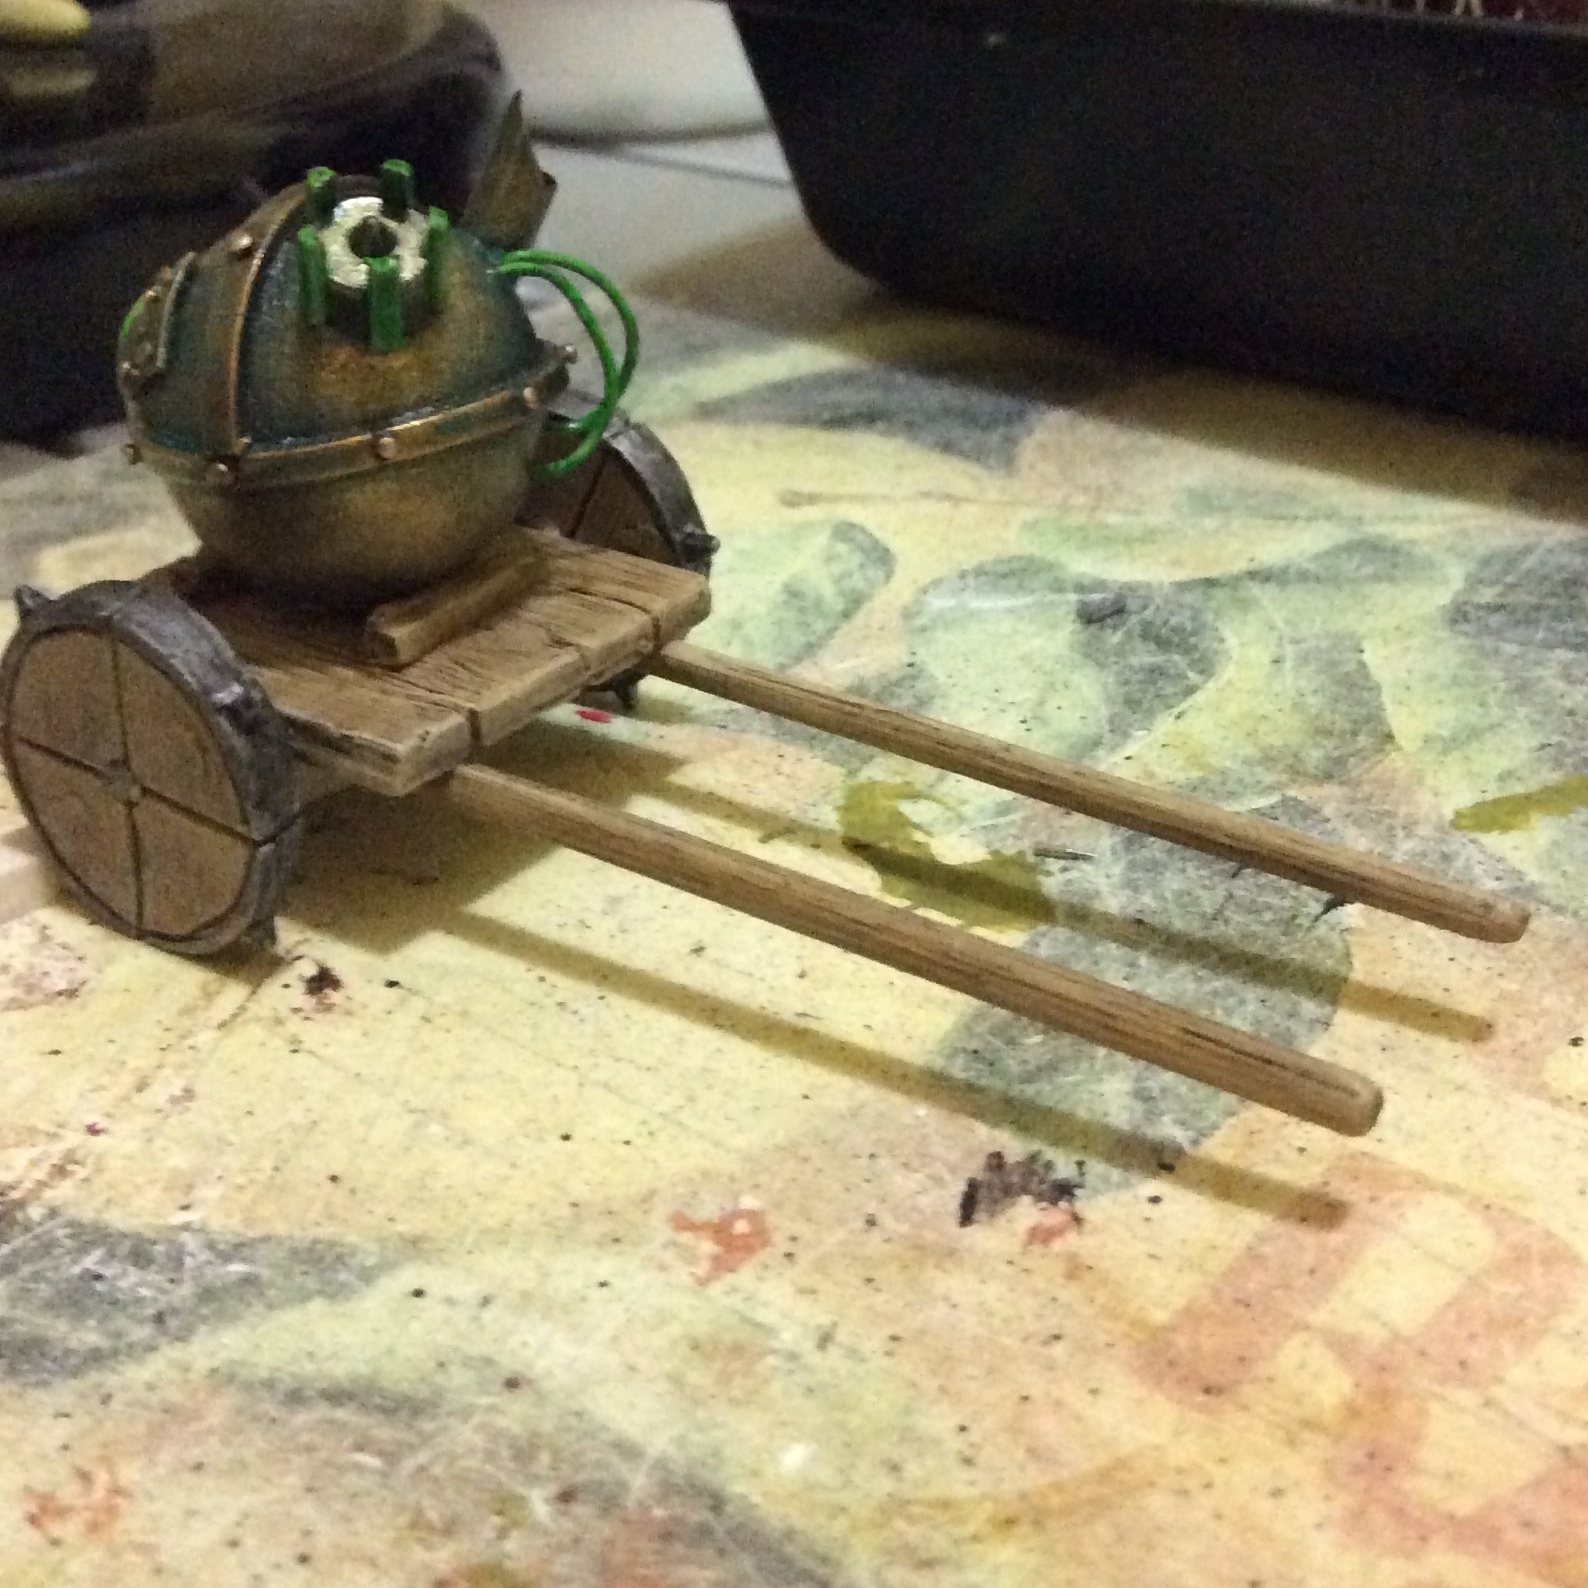
Portable warpstone reactor

Ulfaston winced as another blast of flame scorched the air above the rocky outcrop behind which he and his men were sheltering. The skaven advance on this flank had been slowed, but the infernal warpfire throwers had Ulfaston's company pinned in place. To his right, the King's Shield Guard were being sorely pressed by a pack of rat ogres, whose handlers were whipping them into a murderous rage.

A momentary lull in the barrage of fireballs allowed Ulfaston to steal a glance over the rock. Behind the phalanx of fire machines, something caught his eye. Enslaved skaven were scurrying from some sort of huge metal ball mounted on a cart out to the fire throwers. Strange protrusions from the ball glowed a sickly green as skaven wearing the insignia of Clan Skryre busied themselves around it.


Seeing the gunners priming and aiming their weapons, the dwarf ducked for cover. The wave of sulphurous fire that washed around the rocks was the fiercest of the battle, and Ulfaston noticed some of his newer recruits begin to waver.

'Hold fast, there!' he bellowed. Then, in a flash of understanding, he called for his nephew Harzad. 'Run around back to old Gutlob and tell him and his boys to bring their fire round 15 degrees east and in a hundred yards. They're to see if they can't take a lump or two out of that wagon in behind the fire rats. And quick about it, boy. Things are starting to heat up around here.'

As Harzad scurried off to the artillery battery, Ulfaston looked over to the shield guard. They were holding their line, but had lost more than half their number while behind the rat ogres a verminous tide of skaven was rolling towards them.


The low whistle of a cannon ball passing overhead told Ulfaston that young Harzad had delivered his message. Two more shots fizzed through above his position. 'Shoot straight, you bastards', Ulfaston muttered into his beard. And then all hell broke loose. Ulfaston didn't see the cannon ball that struck the strange machine. All he saw was the terrible green-orange glow that filled the sky as the explosion set off a chain reaction that detonated the nearby warp fire throwers, and the flames that engulfed his redoubt. Dozens of warriors, dwarf and skaven alike, were incinerated in the firestorm. As he passed out from the heat, Ulfaston's last thought was, 'Anyone for a BBQ?'


The Mk V portable warpstone reactor is a valuable, if volatile, addition to any skaven army. Providing a ready source of refined warpstone right where it's needed most, the reactor can enhance the effectiveness of skaven wizards and war machines, although it can also blow a large hole in the skaven's own lines. The following rules apply to the reactor.

  1. The reactor is mounted on a cart pulled by a team of four skaven slaves. The slaves have a standard profile and are unarmoured and armed with hand weapons.
  2. The slaves are able to drag the cart at 4 inches per turn. Each slave that is killed reduces the move by 1 inch. The reactor may not make a reserve move.
  3. Missile fire directed at the reactor should be randomised between the crew and the reactor. The reactor has T 7 and W 3. If its wounds are reduced to zero, it will explode as detailed below.
  4. The reactor is a flammable target. Fire-based attacks that hit the reactor add 1 to their S.
  5. Skaven wizards in base-to-base contact with the reactor may rest and regain 2 magic points per turn. This is an exception to the rule in Warhammer Armies p80, and represents the wizards using the freshly refined warpstone to invigorate themselves.
  6. Skaven warpfire throwers and jezzails that are in base-to-base contact with the reactor may add 1 to their S as a result of being able to use highly refined warpstone as ammunition. Instead of firing, they may choose to stock up on warpstone. For each turn that they are in base-to-base contact, each team may stockpile 1 shot's worth of warpstone up to a maximum of 3 shots. These shots may be used at any time to gain the +1 bonus to S.
  7. Portable reactor technology is in its infancy, and is still highly unstable. At the start of each turn, roll a d20 and consult the table below*
  8. If the reactor explodes, place a 2 inch diameter template over the reactor. All models inside the blast area automatically suffer one S 6 hit with a -3 save modifier.
  9. Portable reactors cost 85 points, which includes the points cost of the slaves.
*1-3 The reactor stabilises. Subtract 1 from the next turn's die roll only.
4-15 The reactor hums along smoothly. Nothing happens.
16-18 Pressure builds up dangerously, and critical processes start to race out of control. Add 1 to the die roll in all subsequent turns.
19-20 The reactor goes critical and explodes!


Tuesday, September 15, 2015

The builder's apprentice - making buildings

As a bit of a side project while working on my Hero Quest miniatures, I decided to have a go at making a couple of buildings from scratch. My only other attempt at a building was the fantasy townhouse using the template from WD137, and I wanted to try designing something myself.

To keep it simple I decided on a cottage, not dissimilar to one featured in a slightly earlier White Dwarf. I used graph paper to draw the design, then put the paper over a piece of foamcard, used a pin to mark holes through the paper into the card, then joined the dots and cut out the pieces with a knife.

I also made a small outbuilding. It was supposed to be stables, but I don't think I quite nailed it. The finished products looked like this...
That orc is a long way from home
I didn't take any WIP shots, I'm afraid. The outbuilding is covered in planks made from a sample sheet of veneer that I picked up from Reverse Garbage roughly cut into planks and glued to the card. Same for the roof. The door and frame is balsa, with the hinges made from cereal packet card and the handle from copper wire looped around a paintbrush to make a ring.
Quick and easy!
It was undercoated with black spray paint, drybrushed with burnt sienna, then 2 shades of burnt sienna and white, the second lighter than the first. Easy!

The cottage had the planks and door made from balsa. The doors and windows had been cut out early on, and backed with cereal packet card. The render is  polyfilla diluted with water to paint-like consistency and painted on. The roof, which I'm quite happy with, is a pot-scourer that I've peeled apart to form two thinner scourers, then cut to shape and glued on with superglue (PVA didn't really work). The door knob is a small ball of air-drying clay.


Spray-painted black. Roof painted with a couple of coats of burnt sienna, then yellow ochre, then drybrushed with yellow plus white. (By the way, all the paints are artists' acrylic from a $2 shop - cost about $2.50 for 100mls, and just get thinned down with water a bit as needed). The render is white with a bit of burnt sienna added to give an off-white, with a lighter shade stippled into the centre of the panels. Timbers are painted as for the outbuilding. The chimney pot is a piece of drinking straw.


They didn't take a huge amount of time, and I'm quite happy with the results. I learned a few lessons along the way:

  • Allow for the thickness of the foam card when designing. 5mm card adds 1cm to the overall length, which is a noticeable amount.
  • I won't bother cutting out the doors and windows again - the rough 'inside' of the card shows through on the inside of the frame and looks a bit untidy.
  • I'd make the chimney a bit bigger, and the cottage a little smaller.
  • Ditto the doors and windows, which are a bit bigger than on the townhouse and make the two buildings look a bit out of scale.
  • Need to cut the scourer just a fraction larger, to overhang the card of the roof so the card edges can't be seen.
Anyways, at some point soon hopefully I'll get them on a table and into a battle!